
Here is a free utility to stop the Windows 10 upgrade. Step 1 Download the utility
Step 2 Install the utility  After you downloaded the utility you need it install it. The downloaded executable will look like this image to your right. Double-click the GwxControlPanelSetup you just downloaded. You will have to click through several standard install screens. (Next, next next ...) The final screen will finish the install and open the Control Panel How to use the control panel 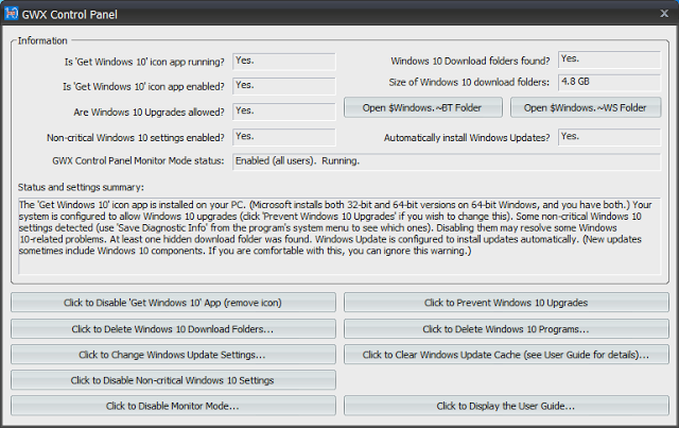 In the bottom third of the Control Panel screen there are 2 columns of buttons. On the left column click "Click to Disable 'Get Windows 10' App" "Click to Delete Windows 10 Download folders" (this will take several minutes) "Click to Disable non-critical Windows 10 Settings" On the right column click "Click to Prevent Windows 10 Upgrades" "Click to Delete Windows 10 Programs" "Click to enable Monitor Mode" (this button may show on the left column) As you click each button, the 'Yes' will change to 'No' in the upper part of the control panel window indicating the Windows 10 process has been stopped. You are done. You may close the ControlPanel Control Panel is provided by Ultimate Outsider - If you wish to make a donation to the author CLICK HERE
Here is how to revert your computer to Windows 7 or Windows 8.1 If it’s been less than a month since you upgraded to Windows 10, you can go back to your previous version of Windows by going to: Settings > Update & security > Recovery and selecting either Go back to Windows 7 or Go back to Windows 8.1. Hint - to find Settings, click the start button (lower left corner of your desktop) and you will see the word 'Settings' This won't affect your personal files, but it will remove any apps you installed after the upgrade to Windows 10 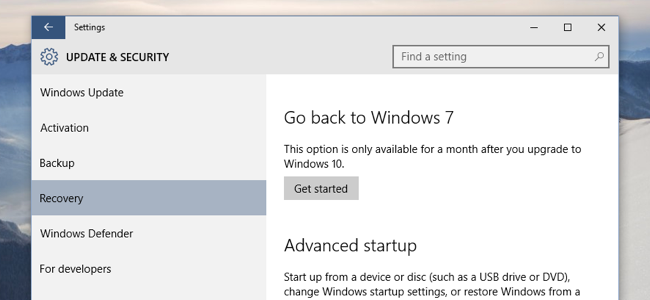 Can I stop this from happening again? Click here for our Blog Post on Installing the GWX Utility
|
AuthorSilloway Support Team Archives
April 2024
Categories
All
|
 RSS Feed
Call today - 802 282-4255Silloway Networks offers Enterprise level support to Small and Medium Businesses in Rutland, Addison, Windsor and Bennington Counties. Employing highly-skilled technicians and developing partnerships with best-of-breed technology providers allows Silloway Networks to provide personalized technology solutions to enhance the operation of your business.
|
|
Website by Silloway Networks